
以下内容由公众号:AIRX社区(国内领先的AI、AR、VR技术学习与交流平台) 发布
![图片[1]-WebAR | 如何使用AR.js创建无缝的移动AR体验-卡咪卡咪哈-一个博客](https://pic4.zhimg.com/80/v2-922bd3cb953b295b06f4e2bc1d12be7f_720w.webp)
关于AR.js
AR.js是一个轻量级的增强现实类JavaScript库,支持基于标记和位置的增强现实。开发人员可以使用几行HTML将AR特性和功能引入任何网站。该项目是开源的,在GitHub上拥有近14,000个stars,各种平台的开发人员正在使用它来创建更多新的数字体验。AR.js框架包括跨浏览器兼容性,并且支持WebGL和WebRTC,这意味着它可以在iOS 11以上的Android和iPhone设备上正常工作。通过包装许多不同的AR框架,包括three.js,a-frame和ARToolKit,AR.js使得将AR引入Web应用程序变得更加简单高效。它具有以下优点:
跨浏览器兼容性即使在较旧的设备上也可以达到60fps的高性能基于Web,无需安装开源,可免费访问使用WebGL和WebRTC在所有移动设备上均可使用无需额外或不常见的硬件可以用不到10行HTML来完成
![图片[2]-WebAR | 如何使用AR.js创建无缝的移动AR体验-卡咪卡咪哈-一个博客](https://pic1.zhimg.com/80/v2-0846d23646372a316df4bb6f920a9134_720w.webp)
AR.js 2.0版本首次引入了另一种类型的增强现实:基于位置的。所以基于标记的与基于位置到底本质上有什么区别呢?实际上基于标记的就是我们现在市面上常见的扫描识别图出现AR模型效果,不管对于识别图也是有要求限制的,AR.js使用artoolkit,它支持多种类型的标记模式或者条形码,也就是我们做CV开发常用的Maker。如下图所示:
![图片[3]-WebAR | 如何使用AR.js创建无缝的移动AR体验-卡咪卡咪哈-一个博客](https://pic2.zhimg.com/80/v2-5ac6ace90f891ebf2dcbb599816b066d_720w.webp)
标记检测:使用AR.js的首选方法是通过标记。由于ARCore和ARKit的出现,从技术上讲,它也可以在没有这些功能的情况下运行,但使用标记可以确保你的体验与所有手机兼容。让我们看看AR.js可以使用哪种标记:
1、条形码
条形码标记是标准的ARToolkit标记,由黑白块组成。如下面这个3×3条码标记的示例。它是一个由白色和黑色块组成的3×3阵列,被黑色粗边框包围。这与代码“ 2”相关联
![图片[4]-WebAR | 如何使用AR.js创建无缝的移动AR体验-卡咪卡咪哈-一个博客](https://pic3.zhimg.com/80/v2-ba431073953e7cd25a6b347c8ed10dce_720w.webp)
你可以使用这个在线工具生成条形码标记:http://au.gmented.com/app/marker/marker.php
2、Pattern marker
AR.js还提供了使用模式标记的可能性。模式标记是自定义标记,由粗黑边框和内部的自定义图像组成。你必须遵循以下准则:
标记应该只使用两种颜色:黑色和浅灰色(#F0F0F0)。建议不要使用白色;该标记必须有一个较粗的黑色边框,如果在黑色边框外还有一个白色边框则更好;形状必须是方形;标记的内容必须完全不对称;该标记将被系统解释为一个16×16的图像,所以确保创建它,使其具有粗线,可以适应类似的低分辨率。大图标,用大字体写的字母,类似的,都可以用作标记。细线则不然;
由于分辨率低,如果您想要使用多个模式标记,请确保它们之间的差异非常大,否则识别时会混淆它们。
![图片[5]-WebAR | 如何使用AR.js创建无缝的移动AR体验-卡咪卡咪哈-一个博客](https://pic4.zhimg.com/80/v2-669c378f592d769c6276ceb5447d45d3_720w.webp)
在本次案例演示使用的是如下marker:
![图片[6]-WebAR | 如何使用AR.js创建无缝的移动AR体验-卡咪卡咪哈-一个博客](https://pic2.zhimg.com/80/v2-bde06167b127f0e850baa55ab391cc29_720w.webp)
如果你需要一些帮助来创建标记,建议你使用这个在线工具:
https://jeromeetienne.github.io/AR.js/three.js/examples/marker-training/examples/generator.html
使用Photoshop绘制标记的方形内容,并将其保存为PNG。这个图像必须是正方形尺寸,512×512或1024×1024都可以;去上述那个链接;选择图案比例0.5;选择图像大小:512px;点击“上传”;选择你想要放在标记里面的图像,就是你开始创建的那个;让系统为你的图像添加边框;点击“下载图像”下载创建的图像;点击“下载标记”下载“已编译”模式。它应该是 “.patt”文件。
![图片[7]-WebAR | 如何使用AR.js创建无缝的移动AR体验-卡咪卡咪哈-一个博客](https://pic4.zhimg.com/80/v2-c053338ac2543461dfa75afe35e4f113_720w.webp)
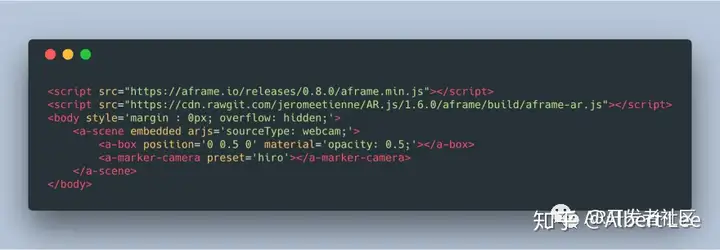
使用A-Frame
如何使用A-frame开发一个AR.js应用程序?如果使用Mozilla的框架a -frame,用AR.js开发非常简单,只需要几行代码。下面我们在上面那个marker上显示一个cube,代码非常简单:
1、Patter markers
<head>
<meta charset=”UTF-8″>
<!– Initialize the viewport –>
<meta name=”viewport” content=”width=device-width, user-scalable=no, minimum-scale=1.0, maximum-scale=1.0″>
<!– Load the required dependencies: A-frame and AR.js –>
<script src=”https://aframe.io/releases/0.9.2/aframe.min.js”></script>
<script src=”https://cdn.rawgit.com/jeromeetienne/AR.js/master/aframe/build/aframe-ar.min.js”></script>
<!– This is a hack because at the time of writing there are some distortions in the provided visuals until the –>
<!– system receives a resize event. The resize event must be triggered when everything has been loaded and the –>
<!– camera has been initialized. All the events I tried didnt work, so in the end I resorted using a 3 seconds –>
<!– time-out after the load event. When this problem will be fixed in the AR.js library, this hack wont be necessary –>
<!– anymore –>
<script>
window.onload = function(){
setTimeout(function(){
var resizeEvent = window.document.createEvent(UIEvents);
resizeEvent.initUIEvent(resize, true, false, window, 0);
window.dispatchEvent(resizeEvent);
}, 3000);
};
</script>
</head>
<body style=margin : 0px; overflow: hidden;>
<!– a-scene defines the scene that we are agoing to use. After arjs= there are various options that can be customized –>
<!– depending on your needs. For now just stick with these ones –>
<a-scene embedded arjs=sourceType: webcam; debugUIEnabled: false;>
<!– Defines the marker that we are going to use. Notice that we are not providing the image file, but the –>
<!– “compiled” .patt file that we got from the online tool. the marker MUST BE ACCESSIBLE VIA HTTPS –>
<a-marker preset=custom type=pattern url=https://skarredghost.com/AR/pattern-Skarredghost_marker.patt>
<!– Here we define the content to show on the marker when it gets detected: a unit cube that lies on the floor and that is red –>
<a-box position=0 0.5 0 color=”red”></a-box>
</a-marker>
<!– Define the camera of the scene –>
<a-entity camera></a-entity>
</a-scene>
</body>
加载依赖关系;使用<a-marker>指令定义标记,该标记指向 上面获得的标记的“编译”版本 ;定义要显示的AR内容(在本例中为多维数据集)。
你可以在以下链接测试该应用程序:https://skarredghost.com/AR/red.html。你可以打印上面的marker,或者你可以打开电脑屏幕上的图片,用智能手机来扫描它。你会看到一个红色的方框跳出来。
![图片[8]-WebAR | 如何使用AR.js创建无缝的移动AR体验-卡咪卡咪哈-一个博客](https://pic1.zhimg.com/v2-ba95b00f8277d5d32458681bd13fac50_b.jpg)
2、条形码
要使用老式的条形码标记,可以使用与上面完全相同的过程。只有两个不同之处:
你必须添加 detectionMode 和 matrixCodeTypea场景的参数;你必须始终使用<a-marker>指令定义标记,但是这次指定“条形码”类型并编写与条形码关联的代码。
<head>
<meta charset=”UTF-8″>
<!– Initialize the viewport –>
<meta name=”viewport” content=”width=device-width, user-scalable=no, minimum-scale=1.0, maximum-scale=1.0″>
<!– Load the required dependencies: A-frame and AR.js –>
<script src=”https://aframe.io/releases/0.9.2/aframe.min.js”></script>
<script src=”https://cdn.rawgit.com/jeromeetienne/AR.js/master/aframe/build/aframe-ar.min.js”></script>
<!– This is a hack because at the time of writing there are some distortions in the provided visuals until the –>
<!– system receives a resize event. The resize event must be triggered when everything has been loaded and the –>
<!– camera has been initialized. All the events I tried didnt work, so in the end I resorted using a 3 seconds –>
<!– time-out after the load event. When this problem will be fixed in the AR.js library, this hack wont be necessary –>
<!– anymore –>
<script>
window.onload = function(){
setTimeout(function(){
var resizeEvent = window.document.createEvent(UIEvents);
resizeEvent.initUIEvent(resize, true, false, window, 0);
window.dispatchEvent(resizeEvent);
}, 3000);
};
</script>
</head>
<body style=margin : 0px; overflow: hidden;>
<!– a-scene defines the scene that we are agoing to use. After arjs= there are various options that can be customized –>
<!– depending on your needs. For now just stick with these ones. –>
<!– Notice that we have added a new detectionMode parameters and also a matrixCodeType one. –>
<!– MatrixCodeType is 3×3 because we have created a 3×3 marker before using the online tool –>
<a-scene embedded arjs=sourceType: webcam; debugUIEnabled: false; detectionMode: mono_and_matrix; matrixCodeType: 3×3;>
<!– Defines the pattern marker that we are going to use. Notice that we are not providing the image file, but the –>
<!– “compiled” .patt file that we got from the online tool. The marker MUST BE ACCESSIBLE VIA HTTPS –>
<a-marker preset=custom type=pattern url=https://skarredghost.com/AR/pattern-Skarredghost_marker.patt>
<!– Here we define the content to show on the marker when it gets detected: a unit cube that lies on the floor and that is red –>
<a-box position=0 0.5 0 color=”red”></a-box>
</a-marker>
<!– Defines the barcode marker that we are going to use. We have just to specify its code, that in this case is 2 –>
<a-marker type=”barcode” value=”2″>
<!– A yellow box –>
<a-box position=0 0.5 0 color=”yellow”></a-box>
</a-marker>
<!– Define the camera of the scene –>
<a-entity camera></a-entity>
</a-scene>
</body>
你可以通过使用浏览器访问https://skarredghost.com/AR/yellow.html页面来测试此应用程序。通常,条形码标记的检测要比图案标记的检测要好,跟踪也要好一些:
![图片[9]-WebAR | 如何使用AR.js创建无缝的移动AR体验-卡咪卡咪哈-一个博客](https://pic2.zhimg.com/v2-68d0b332befb481f34e8aac112562881_b.jpg)
使用three.js
A-frame非常适合开发只需要几行代码的AR解决方案。这是因为A-frame是一个高级框架,是在three.js(用于创建3D应用程序的Javascript库)的基础上构建的。
<head>
<meta charset=”UTF-8″>
<meta name=”viewport” content=”width=device-width, user-scalable=no, minimum-scale=1.0, maximum-scale=1.0″>
<!– three.js library –>
<script src=https://cdn.rawgit.com/jeromeetienne/AR.js/master/three.js/examples/vendor/three.js/build/three.min.js></script>
<script src=”https://cdn.rawgit.com/jeromeetienne/AR.js/master/three.js/examples/vendor/three.js/examples/js/libs/stats.min.js”></script>
<!– ar.js –>
<script src=”https://cdn.rawgit.com/jeromeetienne/AR.js/master/three.js/build/ar.js”></script>
<script>THREEx.ArToolkitContext.baseURL = https://cdn.rawgit.com/jeromeetienne/AR.js/master/three.js/examples/</script>
</head>
<body style=margin : 0px; overflow: hidden; font-family: Monospace;><script>
//////////////////////////////////////////////////////////////////////////////////
// Init
//////////////////////////////////////////////////////////////////////////////////
// init renderer
var renderer = new THREE.WebGLRenderer({
// antialias : true,
alpha: true
});
renderer.setClearColor(new THREE.Color(lightgrey), 0)
// renderer.setPixelRatio( 1/2 );
renderer.setSize( window.innerWidth, window.innerHeight );
renderer.domElement.style.position = absolute
renderer.domElement.style.top = 0px
renderer.domElement.style.left = 0px
document.body.appendChild( renderer.domElement );
// array of functions for the rendering loop
var onRenderFcts= [];
// init scene and camera
var scene = new THREE.Scene();
//////////////////////////////////////////////////////////////////////////////////
// Initialize a basic camera
//////////////////////////////////////////////////////////////////////////////////
// Create a camera
var camera = new THREE.Camera();
scene.add(camera);
////////////////////////////////////////////////////////////////////////////////
// handle arToolkitSource
////////////////////////////////////////////////////////////////////////////////
var arToolkitSource = new THREEx.ArToolkitSource({
// to read from the webcam
sourceType : webcam,
// to read from an image
// sourceType : image,
// sourceUrl : THREEx.ArToolkitContext.baseURL + ../data/images/img.jpg,
// to read from a video
// sourceType : video,
// sourceUrl : THREEx.ArToolkitContext.baseURL + ../data/videos/headtracking.mp4,
})
arToolkitSource.init(function onReady(){
onResize()
})
// handle resize
window.addEventListener(resize, function(){
onResize()
})
function onResize(){
arToolkitSource.onResizeElement()
arToolkitSource.copyElementSizeTo(renderer.domElement)
if( arToolkitContext.arController !== null ){
arToolkitSource.copyElementSizeTo(arToolkitContext.arController.canvas)
}
}
////////////////////////////////////////////////////////////////////////////////
// initialize arToolkitContext
////////////////////////////////////////////////////////////////////////////////
// create atToolkitContext
var arToolkitContext = new THREEx.ArToolkitContext({
cameraParametersUrl: https://cdn.rawgit.com/jeromeetienne/AR.js/master/data/data/camera_para.dat,
detectionMode: mono,
maxDetectionRate: 30,
canvasWidth: 80*3,
canvasHeight: 60*3,
})
// initialize it
arToolkitContext.init(function onCompleted(){
// copy projection matrix to camera
camera.projectionMatrix.copy( arToolkitContext.getProjectionMatrix() );
})
// update artoolkit on every frame
onRenderFcts.push(function(){
if( arToolkitSource.ready === false ) return
arToolkitContext.update( arToolkitSource.domElement )
})
////////////////////////////////////////////////////////////////////////////////
// Create a ArMarkerControls
////////////////////////////////////////////////////////////////////////////////
var markerRoot = new THREE.Group
scene.add(markerRoot)
//HERE we define the marker… specify here your .patt file
var artoolkitMarker = new THREEx.ArMarkerControls(arToolkitContext, markerRoot, {
type : pattern,
patternUrl : https://skarredghost.com/AR/pattern-Skarredghost_marker.patt
})
// build a smoothedControls
var smoothedRoot = new THREE.Group()
scene.add(smoothedRoot)
var smoothedControls = new THREEx.ArSmoothedControls(smoothedRoot, {
lerpPosition: 0.4,
lerpQuaternion: 0.3,
lerpScale: 1,
})
onRenderFcts.push(function(delta){
smoothedControls.update(markerRoot)
})
//////////////////////////////////////////////////////////////////////////////////
// add an object in the scene
//////////////////////////////////////////////////////////////////////////////////
var arWorldRoot = smoothedRoot
// add a torus knot
var geometry = new THREE.BoxGeometry(1,1,1);
var material = new THREE.MeshNormalMaterial({
transparent : true,
opacity: 0.5,
side: THREE.DoubleSide
});
var mesh = new THREE.Mesh( geometry, material );
mesh.position.y = geometry.parameters.height/2
arWorldRoot.add( mesh );
var geometry = new THREE.TorusKnotGeometry(0.3,0.1,64,16);
var material = new THREE.MeshNormalMaterial();
var mesh = new THREE.Mesh( geometry, material );
mesh.position.y = 0.5
arWorldRoot.add( mesh );
onRenderFcts.push(function(){
mesh.rotation.x += 0.1
})
//////////////////////////////////////////////////////////////////////////////////
// render the whole thing on the page
//////////////////////////////////////////////////////////////////////////////////
var stats = new Stats();
document.body.appendChild( stats.dom );
// render the scene
onRenderFcts.push(function(){
renderer.render( scene, camera );
stats.update();
})
// run the rendering loop
var lastTimeMsec= null
requestAnimationFrame(function animate(nowMsec){
// keep looping
requestAnimationFrame( animate );
// measure time
lastTimeMsec = lastTimeMsec || nowMsec-1000/60
var deltaMsec = Math.min(200, nowMsec – lastTimeMsec)
lastTimeMsec = nowMsec
// call each update function
onRenderFcts.forEach(function(onRenderFct){
onRenderFct(deltaMsec/1000, nowMsec/1000)
})
})
</script></body>
如果你想自定义代码,只需查找以“//HERE”开头的注释,它将指向你可以插入自定义标记的位置。sample的最后一部分用来展示你可以在你的屏幕上看到的令人惊叹的动画。链接地址:
https://skarredghost.com/AR/violet.html
![图片[10]-WebAR | 如何使用AR.js创建无缝的移动AR体验-卡咪卡咪哈-一个博客](https://pic2.zhimg.com/v2-a107f4958a69f100bdffe1afd0e92b71_b.jpg)
如何使AR体验无缝
如果我们能结合的QR码标记,体验将会更为顺畅,用户应该只打开一个QR-codes-scanning应用程序(或一些新的智能手机的摄像头应用程序),检测二维码的链接,并打开相关的基于AR技术的网页浏览器。该应用程序将解码标记,并立即开始AR体验!
1、把标记放在qr码里面
QR码可以在其中心包含一个标识。如果我们不用标识,而是插入一个标记,最好是条形码标记,考虑到周围二维码带来的混乱是一个更好的选择,我们可以做到这一点。用户将把二维码框起来,然后网页就会追踪嵌入其中的小标记。这个解决方案的优点是,结果是一个干净的二维码,其中包含一个额外的代码。这样做的好处是标记只占据了代码内部的一小部分表面(这不利于跟踪的稳定性),并且你不能再将你的marker添加到二维码中。要创建二维码,我建议你使用QRCODE MONKEY在线工具。你必须执行的步骤是:
生成我们在上面看到的条形码标记,并将其保存;使用Photoshop在它周围添加一个白色边框前往Qrcode Monkey;选择URL选项卡,告诉系统你要创建一个嵌入URL的qr代码;指定你的AR网页的URL,在我的例子中是
https://skarredghost.com/AR/yellow.html;
点击添加marker图像;点击上传图片;选择你在上面创建的条形码标记的图像并确认;检查“移除Logo后面的背景”标志,这样标记周围的混乱就会减少,提高其跟踪的可能性;点击屏幕右侧创建二维码;点击下载PNG下载你的二维码图片,这样你就可以发布了。
demo测试如下:
![图片[11]-WebAR | 如何使用AR.js创建无缝的移动AR体验-卡咪卡咪哈-一个博客](https://pic3.zhimg.com/v2-89d0886728b421785fc14ddee4a03bea_b.jpg)
2、将QR码放入标记中
我们可以创建自定义标记,那么为什么不能在标记设计中添加QR码?
选择URL选项卡,告诉系统你要创建嵌入URL的QR代码;指定你的AR网页的URL,在我的情况下为
https://skarredghost.com/AR/index.html
;选择设置颜色;选择单色;作为背景色,指定#F0F0F0;如果需要,添加公司的logo,请使用“添加徽标图像”部分;点击屏幕右侧的创建QR码;点击“下载PNG”以下载您的QR码图片;打开Photoshop并创建你的自定义标记,即浅灰色和黑色的图像;将刚刚生成的QR码插入标记中的某个位置;保存图像;如上所示,在与模式标记有关的部分中,使用在线标记培训工具来编译标记并下载生成的标记图像并进行编译
https://jeromeetienne.github.io/AR.js/three.js/examples/marker-training/examples/generator.html
如上所述,在代码中使用自定义标记。
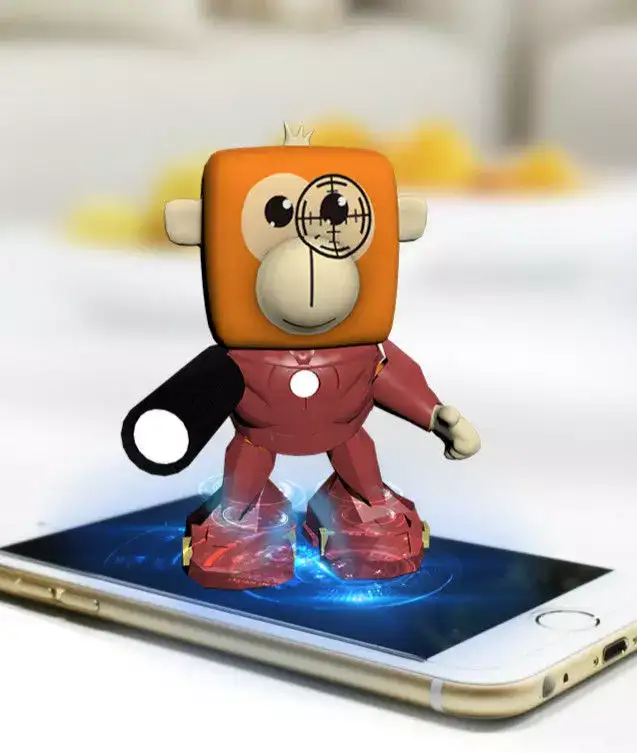
3、3D模型的最终体验
<head>
<meta charset=”UTF-8″>
<!– Initialize the viewport –>
<meta name=”viewport” content=”width=device-width, user-scalable=no, minimum-scale=1.0, maximum-scale=1.0″>
<!– Load the required dependencies: A-frame and AR.js –>
<script src=”https://aframe.io/releases/0.9.2/aframe.min.js”></script>
<script src=”https://cdn.rawgit.com/jeromeetienne/AR.js/master/aframe/build/aframe-ar.min.js”></script>
<!– This is to load the A-frame extras, that contain the required components that are used to show the animations –>
<!– of the 3D model of the robot –>
<script src=”https://rawgit.com/donmccurdy/aframe-extras/master/dist/aframe-extras.loaders.min.js”></script>
<!– This is a hack because at the time of writing there are some distortions in the provided visuals until the –>
<!– system receives a resize event. The resize event must be triggered when everything has been loaded and the –>
<!– camera has been initialized. All the events I tried didnt work, so in the end I resorted using a 3 seconds –>
<!– time-out after the load event. When this problem will be fixed in the AR.js library, this hack wont be necessary –>
<!– anymore –>
<script>
window.onload = function(){
setTimeout(function(){
var resizeEvent = window.document.createEvent(UIEvents);
resizeEvent.initUIEvent(resize, true, false, window, 0);
window.dispatchEvent(resizeEvent);
}, 3000);
};
</script>
</head>
<body style=margin : 0px; overflow: hidden;>
<!– a-scene defines the scene that we are agoing to use. After arjs= there are various options that can be customized –>
<!– depending on your needs. For now just stick with these ones –>
<a-scene embedded arjs=sourceType: webcam; debugUIEnabled: false;>
<!– Here we load the asset of the robot, pointing to its file. A-frame works with GLTF and GLB models. –>
<!– We define a name for this asset, that is “robot” –>
<a-assets>
<!– BrainStem model created by Keith Hunter and owned by Smith Micro Software, Inc. Exported from Poser and made available under clause (g) of “Legitimate Uses” as defined by the Poser Pro EULA. –>
<a-asset-item id=”robot” src=”https://skarredghost.com/AR/BrainStem.glb”></a-asset-item>
</a-assets>
<!– Defines the marker that we are going to use. Notice that we are not providing the image file, but the –>
<!– “compiled” .patt file that we got from the online tool. the marker MUST BE ACCESSIBLE VIA HTTPS –>
<a-marker preset=custom type=pattern url=https://skarredghost.com/AR/pattern-Skarredghost_marker_qr.patt>
<!– Here we define the content to show on the marker when it gets detected: the GLTF model of the robot that we specified above. –>
<!– Notice the mention to the name robot that we specified above. –>
<!– The animation-mixer is the A-frame component to control the animation of the 3D model. Since we are not specifiying any animation –>
<!– name, it just loops all the animations of the model –>
<a-entity gltf-model=”#robot” animation-mixer></a-entity>
</a-marker>
<!– Define the camera of the scene –>
<a-entity camera></a-entity>
</a-scene>
</body>
![图片[13]-WebAR | 如何使用AR.js创建无缝的移动AR体验-卡咪卡咪哈-一个博客](https://pic2.zhimg.com/v2-bb9326950ffb63013edb2eed644c6dbd_b.jpg)
AIRX团队整理自:
https://skarredghost.com/2019/08/29/how-to-seamless-mobile-ar-js/
关于更多WebAR开发文章,可以查看:
WebAR开发指南(1)—使用AR.js实现第一个WebAR demo
万字干货介绍WebAR的实现与应用


暂无评论内容